jueves, 28 de febrero de 2013

Week 4 - WordArts Emo (delayed)

Hi!!
I'm a big delay with this proyect, so I know that it's the week number 9, but I want to recuperate the weeks that I've not posted. So this is a good time to post the WEEK 4.

Hola!!
Tengo un gran retraso con este proyecto, y se que esta es la semana numero 9, pero quiero recupear las semanas que no he posteado. Asi que este es un buen momento para postear la SEMANA 4


Gracias por leer
Thanks for reading!!


miércoles, 27 de febrero de 2013

Tag 10 CT: Sexy Blow

*****************************************************
ENGLISH // INGLES
******************************************************
LadyMishka and Hania's Design Creative Team

The caracteristic are: size 600x600 pix. in png format with transparent bg.
For obtain this tag, you can write me an e-mail with the subject "Request Tag 10 CT: Sexy Blow"

  . STATUS: · CLOSE· 
 DONE ONLY 10 TAGS OF THIS ONE
Thank you!!!
(  pandora.creations.art (at) gmail.com  )

 For this tag I used an old tube from Lady Mishka,
" STRAWBERRIES "
with different colors and a lot of layers
!!!!
 Also, I use the Cluster Frame that I've maken yesterday, with the wonderful kit of Hania's Design "Blowing in the Wind".
Do you want to know more about this Cluster and
the kit of Hania???
Please, go to this post and read more ;)


  ******************************************************
SPANISH // ESPAÑOL
******************************************************

EQUIPO CREATIVO DE LADYMISHKA Y HANIA'S DESIGN
 
Las caracteristicas son de tamaño 600x600 pixeles y en formato png con fondo transparente
Para pedir este tag, puedes escribirme un correo con el asunto " "Solicitud Tag 9 CT LadyMishka: Beautiful day".


. ESTADO:  · CERRADO· 
HICE 10 FIRMAS DE ESTA
 
Gracias!!!!!
(  pandora.creations.art (at) gmail.com  )
 
Para este tag usé un antiguo tubo de Lady Mishka,
" STRAWBERRIES "
con diferentes colores y un monton de capas!!
Tambien usé el Cluster Frame que hice ayer, con el fantastico
kit de Hania's Design, "Blowing in the Wind".
Quieres saber mas sobre este Cluster y 
el kit de Hania??
Por favor, ve a este post y lee mas ;)


martes, 26 de febrero de 2013

CT Cluster Frame

I want to show you my new creation with the awesome kit of Hania's Desing. 
Look, with the Kit Blowing In the Wind I've done this Cluster, and I want to share with all of you and Tomorrow I will bring you an awesome tag for offer ;)


Don't forget visit her blog to found where you can found it ;)


lunes, 25 de febrero de 2013

New Tube Dolly Love, Version 2.0.

Yesssss, and then she is!!!
I wanted to re-made my "Dolly Love", and now she's done, and she is on sale on Sweet-PinUp Store!!!
Look the new version:

Siiiiii, y ahora esta ella!!!!
Quería rehacer my "Dolly Love", y ahora ya esta hecha, y esta a la venta en Sweet-PinUp Store!!!
Mira la nueva version:


She has 38 layers, with different colors of the hair and the clothes. Also counts with 3 differents hearts, with the heart without words, other with the word "sweet love" and a broken heart and "love hurts" word. You can combine all colors for fun!!!!

Tiene 38 capas, con diferentes colores en el cabello y en las ropas. Tambien cuenta con 3 direntes corazones, con un corazon sin palabras, otro con la palabra "sweet love", y un corazon roto con las plabras "love hurts". Puedes combinar los colores para tu diversion!!


domingo, 24 de febrero de 2013

SPU 1/2 Cake Sale

TODAY Store over-wide
24 hrs
and get today all for -50% in Sale
Have a great day ♥
*********************************************************************************
HOY amplia variedad en la Tienda
24 hrs
y obten hoy todo por el -50% de descuento
Ten un buen dia ♥
 *********************************************************************************
Fairy Lilly
$ 1,85 $ 0,93
 

viernes, 22 de febrero de 2013

PTU Tutorial Attitud - English/Spanish


For this tutorial I use my tube Charlotte, you can buy it for only $ 1,50 here:
And the ScrapKit Gothic Suzy from Hania's Design. Visit her blog to know where is avaliable this kit.

Let's go!!

1. Take the elemen 43 and resize to 90% and align it at center
Toma el elemento 43 y redimensionalo al 90%, alinealo al centro.

2. Take the element 10 and resize at 80%, and put under the layer of the frame.
Toma el elemento 10 y redimensionalo al 80%, y ponlo debajo de la capa del marco.

3. Take the tube, and resize it at 30%, we only need the close up, so don't worry if you think it's very big. Put in the center of the canvas, and cut the part that we don't need.
Toma el tubo, y redimensionalo al 30%, solo necesitamos la parte de arriba, asi que no te preocupes si piensas que es demasiado grande. Ponlo en el centro del lienzo y corta la parte que no necesites.

4. Now, take the element 39 and resize it at 25%, and you must situate it on the left site at top, as if the girl is seeing the buterflies.
Ahora, toma el elemento 39 y redimensionalo al 25%, y debes ponerlo en la parte izquierda en la parte de arriba, como si la chica estuviera viendo las mariposas.

5. Take the element 4 and put at the botton of the canvas
Toma el elemnto 4 y ponlo abajo del lienzo.

6. Take now the elemnt 17 and resize at 45%, and put it on the middle of the element 4
Toma ahora el elemento 17 y redimensionalo al 45%, y ponlo en el medio del elemento 4.

7. Take the element 21 and resize at 70%. Put it on the left side, follow the circle.
Toma el elemento 21 y redimensionalo al 70%. Ponlo en el lado izquierdo, siguiendo el circulo.

8. Now take the element 66 and put on the right side, also follow the circle as the previous element. I rotated the element 2º right, to make it more natural.
9. Ahora toma el elemento 66 y ponlo en el lado derecho, tambien siguiendo el circulo como en el elemento anterior. Yo lo rote 2º a la derecha, para que quedara mas natural

10. Take the paper 2 and put it on your creation, under all the layers. Next, add it a mask. I've put a grunge mask, but I think everyone would be good.
Toma el papel 2 y ponlo en tu creacion, debajo de todas las cpas. Luego, añadele una mascara. Yo le puse una mascara grunge, pero creo que cualqueriera estaría bien.

11. Before make more steps, please, be sure that your works is totally clear, I want to mean, if you need to delete something, like parts of the body of the tube to stay inside the circle, or the ring of the cros, please, do it before continue.
Antes de hacer mas pasos, por favor, asegurate de que tu trabajo esta totalmente limpio, quiero decir, si necesitas borrar algo, como partes del cuerpo del tubo para estar dentro del circulo, o la anilla de la cruz, por favor, hazlo antes de continuar.

12. Now, it the time to add drop shadows in the elements 39,4,17,21 and 66. I use these settins 2 - 2 - 65 - 10
Ahora es hora de poner un poco de sombra en los elementos 39, 4, 17, 21 y 66. Yo use estas medidas 2 - 2- 65 - 10

On the tube, use this shadow : 4 - 4- 40 - 15
En el tubo, usa esta sombra: 4 - 4 - 40 - 15

And last, on the frame (element 10), use this settings for shadows: 2 - 2 - 80 - 5
Y por ultimo, en el frame (elemento 10) usa estos valores para la sombra: 2 - 2 - 80 - 5

Remember that the element 43 and the paper with the mask don't have shadows.
Recuerda que el elemento 43 y el papel con la mascara no tienen sombra.

13. Now, it's time for small details: Add the element 75 around the tube, and delete what you don't want to see.
Ahora es tiempo para los pequeños detalles: añade el elemento 75 alrededor del tubo y borra lo que no quieres ver.

14. And last, the element 80 put under all the layers. Put it in the left side and duplicate the layer, and make mirror. Situate the duplicate in the right side.
Por ultimo, el elemento 80 ponlo debajo de todas las capas. Ponlo en el lado izquierdo y duplica la capa, y haz espejo. Situa el duplicado en el parte derecha.

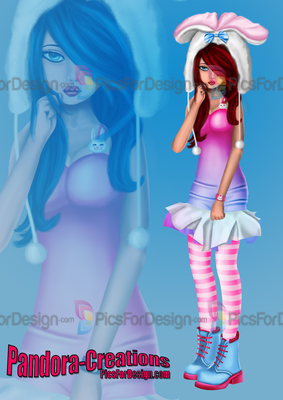
Finally, add the credits of the tube and the kit, and put the name, as I've done.
 Finalmente, añade los creditos del tube y del kit, y pon tu nombre como yo he hecho.


Tutorial realizado por Pandora-Creations el 22 de Febrero de 2013. No se permite la copia parcial o total de este tutorial sin consentimiento expreso y escrito de la autora (yo). Si tienes dudas, mandame un correo!!!

jueves, 21 de febrero de 2013

Tutorial Candy Girl


Para este tutorial he elegido este bello tubo de Lady Mishka. Una preciosidad solo disponible en Scrap and the City (SATC) con compras superiores a $5, ya que no esta a la venta. Tiene un monton de capas, elige tu combinacion!!!!

TUTORIAL CANDY GIRL

  1. Abrimos un lienzo de 600x600 de fondo transparente


  1. Añadimos una forma que nos guste. Puede ser solida o hueca, el caso es rellenarla despues con un color solido.
  2. Una vez relleno, nos vamos a Filtros – Xero – Soft Vignette y le damos estos valores


  1. Ahora en el borde de la forma, o en el resto de la forma que nos queda, le damos una textura punteada, de esta manera: Efectos – Textura – Textil, y le damos este valor


  1. Como toque especial, a este borde o relleno, vamos a darle una sombra gruesa, para que quede con relieve, Vamos a Efectos- Efectos 3d- Aplicar Sombra, con estos valores:


  1. Ahora le damos sombra al tubo que hemos elegido, de la misma manera que el paso anterior pero con estos valores:


  1. Ahora le vamos a poner una máscara. En mi caso, he elegido una con forma redonda, para que solo se vea un poco el borde resplandeciente, en concordancia con la forma elegida, por lo que quedaria de esta manera:


  1. Añadimos los creditos y el nombre, y ya esta listo!!!


Aqui te dejo otro ejemplo, esta vez añadiento mas objetos de scrap, para que veas que pueden añadirse elementos al gusto y quedaria igual de bello, o incluso mas!!!

Para este otro ejemplo, he usado el tubo emo de Celine PinUp, a conjunto con su Scrap, que puedes obtener aqui
http://scrapsandthecity.com/store/index.php?main_page=product_info&cPath=339_195_293&products_id=3361


Tutorial realizado por Pandora-Creations el 20 de Febrero de 2013. No se permite la copia parcial o total de este tutorial sin consentimiento expreso y escrito de la autora (yo). Si tienes dudas, mandame un correo!!!


Safe Creative #1302204628851

miércoles, 20 de febrero de 2013

New CT For and Cluster Frames for Free!

I want to anounce that I'm part of the Creative Team of Hania's Design, who makes a beautiful and awesome kits. So from now, I will bring you some works from her kits.
In this occasion, I bring you tree Easter Clusters, from the kit Bunny Love. Please, visit Hannia's blog to see all her kits, and don't forget to buy this one, is PERFECT!!!

Quiero anuncir que soy parte del Equipo Creativo de Hania's Design, que hace unos preciosos y fantasticos kits. Asi que a partir de ahora, os traere algunos trabajos de sus kits.
En esta ocasion, os traigo tres Clusters de Pascua, del kit Bunny Love. Por favor, visita el blog de Hania y mira todos sus kits!! y no olvides comprar este, es PERFECTO!


Have you seen that is perfect to match with my tube "Bunny"???? 
Look!!! I make these tags with the different clusters, I hope you like them!!! 

CLUSTER 1


CLUSTER 2
CLUSTER 3


martes, 19 de febrero de 2013

Tag 9 CT LadyMishka: Beautiful Day

*****************************************************
ENGLISH // INGLES
******************************************************
LadyMishka Creative Team

The caracteristic are: size 600x600 pix. in png format with transparent bg.
For obtain this tag, you can write me an e-mail with the subject "Request Tag 9 CT LadyMishka: Beautiful Day".


  . STATUS: · CLOSED · 
I'VE DONE ONLY 10 TAGS OF THIS ONE
Thank you!!!

(  pandora.creations.art (at) gmail.com  )

You also can request for in the group of LadyMishka Fans on Facebook 


 For this tag I used the new tube from Lady Mishka,
"IRISHKA (LADYMISHKA)"
with different colors of the
stockings and big head (close up)!!!!
and it's available on PICS FOR DESIGN (pfd) 
http://picsfordesign.com/en/catalogue/id_104649_irishka_ladymishka.pix

You can see the stock of Lady Mishka on PFD here
 http://picsfordesign.com/en/catalogue/sort/date/auth/LadyMishka


******************************************************
SPANISH // ESPAÑOL
******************************************************

EQUIPO CREATIVO DE LADYMISHKA
 
Las caracteristicas son de tamaño 600x600 pixeles y en formato png con fondo transparente
Para pedir este tag, puedes escribirme un correo con el asunto " "Solicitud Tag 9 CT LadyMishka: Beautiful day".


. ESTADO:  · CERRADO · 
SOLO HICE 10 FIRMAS DE ESTA
 
Gracias!!!!!
(  pandora.creations.art (at) gmail.com  )
  
Tambien puedes pedir este tag en el grupo de Facebook LadyMishka Fans

Para este tag use el nuevo tubo de LadyMishka,
"IRISHKA (LADYMISHKA)"
con un varias capas de color de calcetines y cabeza en grande (close up)
y esta disponible en PICS FOR DESIGN (PFD) 
 

Puedes ver mas stock de LadyMiska en PFD aqui:

lunes, 18 de febrero de 2013

Tag 8 CT LadyMishka: Queen

******************************************************
ENGLISH // INGLES
******************************************************
LadyMishka Creative Team

The caracteristic are: size 600x600 pix. in png format with transparent bg.
For obtain this tag, you can write me an e-mail with the subject "Request Tag 8 CT LadyMishka: Queen".
  . STATUS: · CLOSED· 
DONE ONLY 10 TAGS OF THIS ONE
Thank you!!!

(  pandora.creations.art (at) gmail.com  )

You also can request for in the group of LadyMishka Fans on Facebook 


 For this tag I used the new tube from Lady Mishka,
"ELISA"
with different colors of the hair and eyes!!!!
and it's available on SCRAPS AND THE CITY (SATC) 
 
You can see the stock of Lady Mishka on SATC here
 http://scrapsandthecity.com/store/index.php?main_page=index&manufacturers_id=170
  
******************************************************
SPANISH // ESPAÑOL
******************************************************

EQUIPO CREATIVO DE LADYMISHKA
 
Las caracteristicas son de tamaño 600x600 pixeles y en formato png con fondo transparente
Para pedir este tag, puedes escribirme un correo con el asunto " "Solicitud Tag 8 CT LadyMishka: Queen".


. ESTADO:  · CERRADO· 
REALIZADAS 10 FIRMAS DE ESTA
 
Gracias!!!!!
(  pandora.creations.art (at) gmail.com  )
  
Tambien puedes pedir este tag en el grupo de Facebook LadyMishka Fans

Para este tag use el nuevo tubo de LadyMishka,
"ELISA"
con un varias capas de color de cabello y ojos!!
y esta disponible en SCRAPS AND THE CITY (SATC) 
 

Puedes ver mas stock de LadyMiska en SATC aqui:


domingo, 17 de febrero de 2013

Next CT Call

In the next two weeks I will open one a CT call. Are you going to lose it?

En las proximas 2 semanas voy a abrir una llamada de CT. Te lo vas a perder?

New Tube Bunny!!! Not only for Easter :)

Are you ready for Easter????
Now you can buy my new tube on Pics For Design perfect to make your creations for Easter Time. The tube count with a hat with bunny ears in a separate layer and several layers to make your own creations: main colors to change: pink, black, blue and purple! The hair have 4 colors too: black/blue, red hair, brunette and black/pink. Also includes a extra layers with the sking and makeup. Total: 39 layers. What you waiting for???
Only on PicsForDesign (PFD)


Estas preparada para la Pascua???
Ahora puedes comprar mi nuevo tubo en PicsForDesign perfecto para hacer creaciones para el tiempo de Pascua. El tubo cuenta con un sombrero con orejas de conejo en una capa separada y muchas capas para hacer tu propia creacion: colores principales para cambiar: rosa, negro, azul y morado! El cabello tambien tiene 4 colores: negro azulado, rojo, castaño y negro/rosa. Tambien incluye una capa extra de piel con maquillaje. Total: 39 capas